Although SWF cartoons are no longer as popular as they once were, there are still a large number of them out there including classics such as Happy Tree Friends or Simon’s Cat. If you want you can still find and watch them online by streaming them using a Flash-enabled browser, but it isn’t as easy to save them or watch them offline.
The main problem with saving SWF cartoons is that there often isn’t a link that you can use to download them. On the other hand watching them can present a challenge as well, as more modern devices rarely support Flash – especially in the case of mobile devices that have gradually moved away from it.
Because of that, if you’d like to be able to watch SWF videos offline, or on other devices – it would be best if you find a different method to save the videos and also convert them to a more widely-used video format such as MP4. On both those fronts Movavi Screen Recorder can help, and it is easy to use it to save and learn how to convert SWF to MP4 with it.
How to Download SWF Videos and Convert Them to MP4
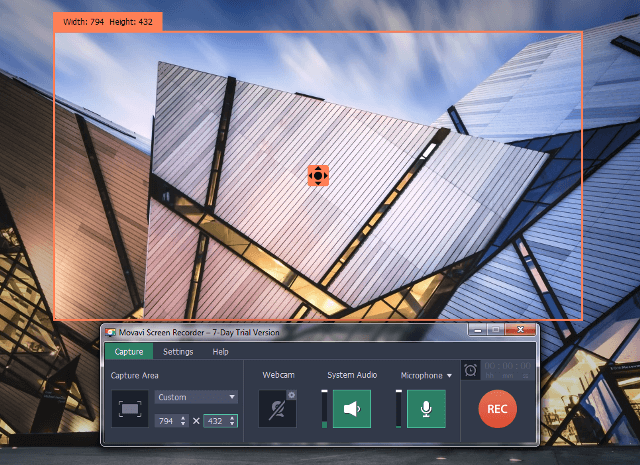
If you would like to download SWF videos, the first thing you should do is open up the SWF video – either on the website it is hosted on, or in an individual player. After that you can launch Movavi Screen Recorder and set it to record the part of your screen where the SWF video is located by either clicking on a window that you want to record, or drawing a frame on your screen over the area.

In some cases you may want to record the SWF video while it is playing in full screen (though many SWF players don’t provide that option). If that is the case, you can click anywhere after launch Movavi Screen Recorder then select your monitor in the ‘Full Screen’ section of the list under ‘Capture Area’.
Once you’ve defined the capture area, Movavi Screen Recorder’s interface will appear and you should check that the ‘System Audio’ icon is highlighted in green and the ‘Microphone’ icon isn’t highlighted (i.e. is grayed out). If you need to toggle either of these icons, click on them once, and if you want you can also adjust the sound levels by using the sliders located right beside either icon.
When you’re ready to start recording, hit the ‘REC’ button and play the SWF video within the next 3 seconds. The controls in the interface will let you pause, cancel, or stop the recording – and when you do click on the ‘Stop’ icon Movavi Screen Recorder will immediately save your video in MKV format and open up a preview window.
Instead of manually controlling the recording, you could click on the ‘alarm clock’ icon prior to clicking ‘REC’. In the window that opens you can set a timer or schedule the recording. If you set a timer you will have to manually start recording by pressing ‘REC’ but Movavi Screen Recorder will then automatically stop it after the duration that you specify. On the other hand if you schedule both the start and stop time, it will automate the recording completely.
In any case, once the recording is done and the preview window opens up you can check to make sure the recording went off without a hitch, or trim out any parts of the video that aren’t needed. After that you can switch the SWF video to a MP4, by clicking on the ‘Save As’ button and selecting one of the MP4 presets – or any other video format you’d like Movavi Screen Recorder to use.
That should cover everything you need to know about saving and converting SWF to MP4. As you can see Movavi Screen Recorder will make it a walk in the park, and in fact you could use it to record pretty much any video footage you need from your screen. It is worth noting that rather than saving your videos in a specific format, you could use the built-in presets instead to automatically optimize them for various devices or platforms so you don’t have to worry about compatibility.
