
Windows 11 has started a new version of Windows OS with a centered taskbar, better user experience, faster processing, and more. However, some rudimentary issues are common to all OS, such as accidental deletion or data loss. The problem might seem like a blunder, and it indeed is a blunder, but this blunder could be easily rectified. This blog enumerates several DIY solutions to help you recover deleted files from Windows 11.
Best DIY Solutions to recover deleted files from Windows 11
If you face an issue on your Windows 11 PC, you might go for the professional help from a technical expert. Windows 11 is quite new, and you still might lack the confidence to deal with the issue on your own, and in most cases, that is the right step. However, if you have lost or deleted data on your Windows 11 PC, you can easily deal with it using the DIY methods given here. Just follow the steps to recover deleted data without any difficulty.
Solution 1: Recover deleted files from Recycle Bin
Suppose you have accidentally or deliberately deleted data only by pressing the Delete key or choosing the Delete option from right-click menu. In that case, you can check for the deleted files in Recycle Bin. Any data lost in the manner as mentioned above is stored in the Recycle Bin, and you can recover the deleted files from Windows 11 using the steps below:
Step 1: Open the Recycle Bin by clicking the icon on your Desktop or the folder in the File Explorer.
Step 2: Locate the deleted file in the Bin and select it.
Step 3: Right-click on the file and choose Restore.

The file will be restored to its original location on your Windows PC.
Solution 2: Recover deleted files from Windows 11 using File History
If you have enabled the File History feature during the setup of Windows 11, you can recover your data lost permanently due to deletion, formatting, or corruption. To recover deleted files from Windows 11 using File History, follow the steps below.
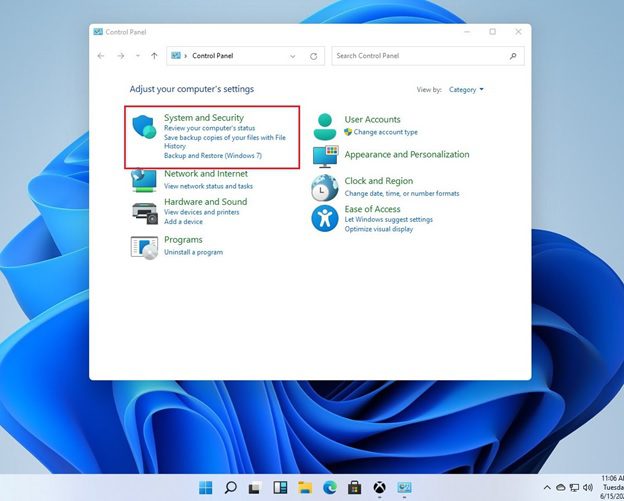
Step 1: Click the Start button, search for Control Panel and click the first search result to open it.
Step 2: Select System and Security from the options in the new window.
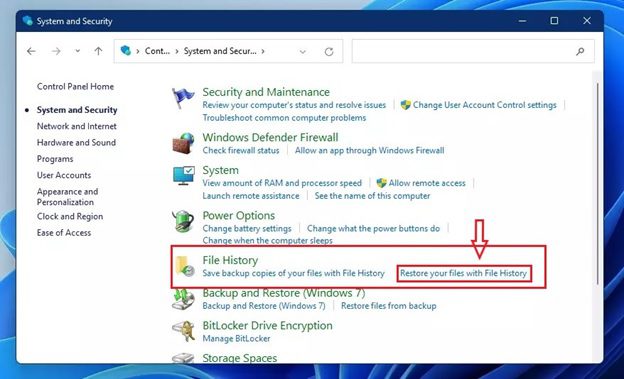
Step 3: Click the Restore your files with the File History option under the File History section.
Step 4: Choose from the backups according to your choice of date and time and open the folder.
Step 5: Locate and select the data you are looking for and click Restore or Restore to.
Step 6: Choose a location to save the restored data.
Note: It is best to save your recovered data on an external storage device as it may save you from the chances of overwriting and keep the data on your internal drive safe.
Solution 3: Use the Backup and Restore (Windows 7) feature to recover files
Backup and Restore (Windows 7) is another native feature of Windows 11, and it keeps a backup of your data if enabled. You can easily recover deleted files from Windows 11 using this feature. To retrieve your lost or deleted data, use the following steps.
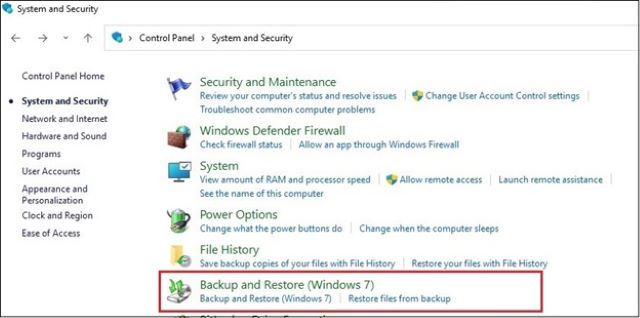
Step 1: Open the Control panel and select the System and Security option.
Step 2: Select the Backup and Restore (Windows 7) and click Restore my files.
Note: If you have multiple users on your system, you can choose the Restore all users’ files option at the bottom left to restore data with Admin access.
Step 3: Now select the files/folders you want to recover and click Browse for files or Browse for folder.
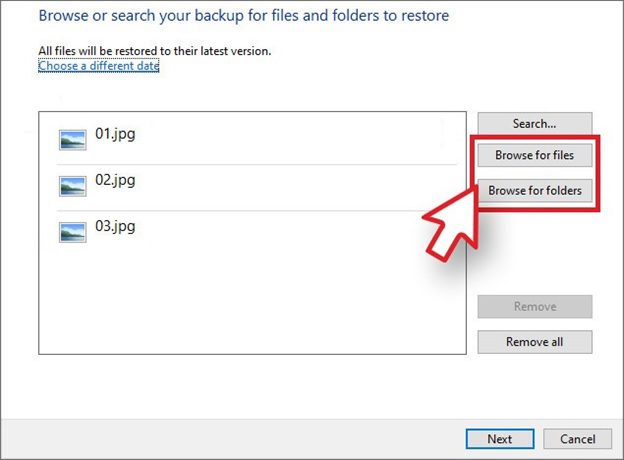
Step 4: Click Next, choose the location and click Restore.
Solution 4: Recover deleted files from Windows 11 with Command Prompt
Command Prompt is a one-stop solution to most Windows OS issues. You can easily use it to recover the lost or deleted files on your Windows PC if you know the command line meant for this purpose. You need to run the ATTRIB command to conduct the recovery of data. Here is how to do it.
Step 1: Type cmd in the search bar and click Run as Administrator from the options under the Control Panel icon in the right panel.
Step 2: Click Yes to allow Command Prompt to make changes in the system.
Step 3: Insert the command Chkdsk D:/f in the Command line and hit Enter.
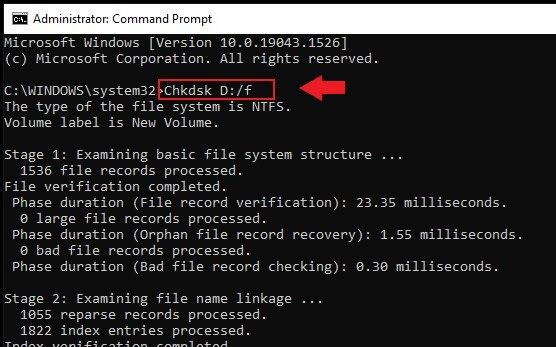
Note: In the above command, replace the letter D with your hard drive letter.
Step 4: Once the process is complete, insert the command attrib -h -r -s /s /d N:\*.* and hit Enter.
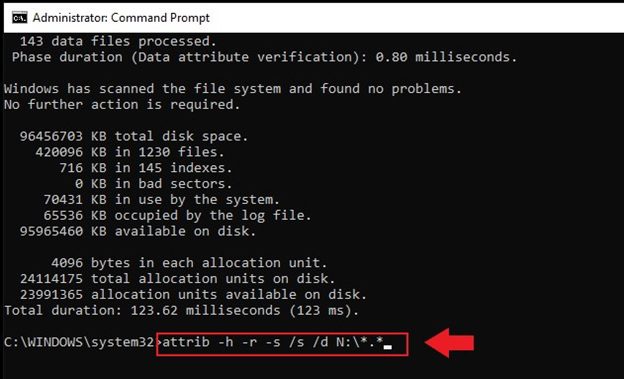
Note: Replace the letter N with your hard drive’s letter. This letter represents the drive selected to store the recovered data.
Allow the process to complete. A new folder will be created on the selected hard drive, and all the recovered data will be saved in it on completion of the process. Although, the recovered files might be in CHK format. Change the format to make the data accessible.
Solution 5: Recover deleted files from Windows 11 using software
This is the most comprehensive, easy, and hassle-free solution for foolproof data recovery on Windows 11. You may lose data due to deletion, formatting, corruption, malware, or other reasons. To counter any such data loss situation on your Windows PC, you can use the Stellar Data Recovery for Windows. It doesn’t affect the other data stored on your PC and accurately targets only the data you want to recover. The DIY software is a powerful data recovery solution capable of recovering any data type on Windows with utmost precision and security.
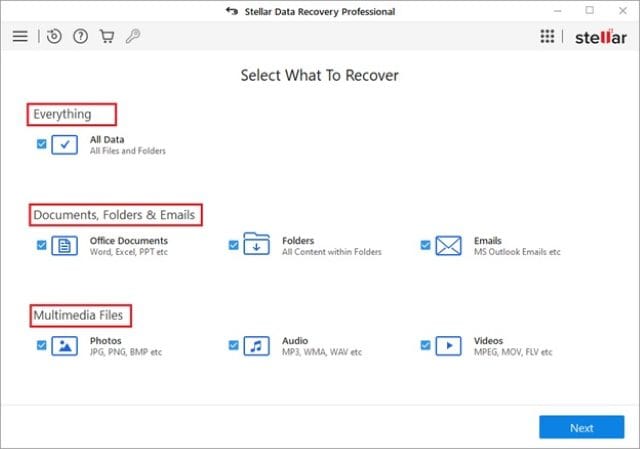
Moreover, it comes in four versatile variants —free, Standard, Professional, and Premium to help you choose the perfect fit for your cause. With a simple user interface, you can use the software to recover data in three simple steps.
- Select the type of file you want to recover.
- Choose the location from where you want to recover the file.
- Scan the location, preview the recovered data and save it at a location of your choice.
To wrap it up
All the above methods are carefully chosen to assist you in recovering the deleted data on Windows 11 PC. To avoid any such data loss scenario, try to develop a habit of taking backup of your data and managing the files and folders on your PC regularly. Stay connected for more amazing guides and solutions.