
Microsoft Office 365 is the Cloud-based Platform and it provides a very secure Exchange Online environments. With the Office 365, you can easily access your mailbox from anywhere and any device like Laptop, Tablet, Mobile, and Apple Phones or Laptops. That’s why most of the people are moving into O365. Here I am going to explain that how to convert or upload OST into Office 365 Exchange Online environment. If you are trying to move from MS Outlook to O365 cloud platform, then this blog will help you import the OST file data such as email, contacts, calendar, appointments, and attachments etc. into the Exchange Online mailbox.
In this article, you will see all possible methods to ensure how to Upload or Convert OST into Office 365 Exchange Online environment. There is no direct manual method for OST to O365 Migration but if you want to know the manual process then follow these step by step solutions.
Method1: Import OST into Office 365 Cloud Platform Manually
Follow the given instruction for OST to Office 365 Migration.
- Convert OST file into MS Outlook PST format.
- Export PST to Office 365 Exchange Online.
Step 1: Convert OST file into MS Outlook PST format:
- Open your Outlook account then go to import and export option by clicking on File.
- After that choose Export to a file >> Next.
- Now click on Personal Folder File (.pst) and again hit on Next.
- Check the Include Subfolder option and click Next.
- At the last, browse the location where you want to save the PST file and Next.
- Now you can put the password otherwise hit on Ok.
Note: If your Exchange Server is Offline and you are not connected with the server then, this manual process will not work. At that time you need to use a third-party Tool for Moving OST to PST. There are many third-parties application available so I recommended you to use MailsDaddy OST to PST Converter for Exporting OST file data into PST format.
Step 2: Export PST to Office 365 Exchange Online
To know the manual process for Converting PST file into O365 Cloud Mailbox. Follow all the step by step solution.
- Login Office 365 Admin Account and open Exchange Admin Center window by clicking Exchange on Admin Center
- Once the window will open on the screen then go to Permission>> Organization Management>>and click + sign and choose Mailbox Import Export option >> Add >> Ok.
- Now select Mailbox Import Export one more time and Save.
- After it go to Setup by clicking Admin and choose Data Migration >> Upload PST file, once you click you need to hit on New Import Job and type the job name >>Next>> Next.
- Here you will see a new window then hit on Show Network Upload SAS URL and copy the URL after that click Download Azure AzCopy& install it.
- After that open the installed Azure AzCopy Tool and type the blow given commend.
“AzCopy.exe/Source: \\Network Path or File location/Dest:”SAS URL” /V: location path where you want to save the log file /AzCopy.log /Y”
Sample Example:
AzCopy.exe/Source:\\DESKTOP-MPKVU38\Users\le\Desktop\Import/Dest:”https://476d07f3b7d444a7a00a5a7.blob.core.windows.net/ingestiondata?sv=2015-04-05&sr=c&si=IngestionSasForAzCopy201806090656050007&sig=hccYVWvlkOhp6FISVYywwt9W9YlzRoQfXqGZvq14jqM=&se=2018-07-09T06:56:09Z”/V:c:\Users\le\Desktop\AzCopy.log /Y
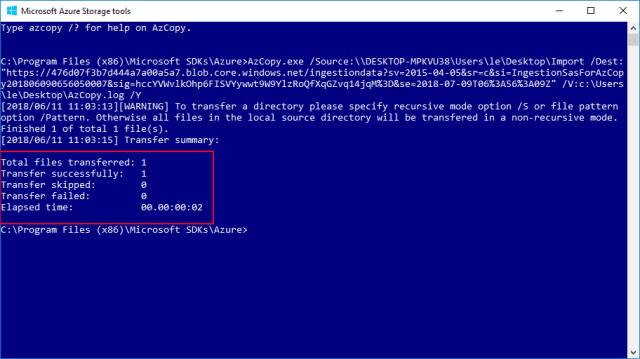
- Once it done hit on Enter key on the keyboard.
- When the PST file upload on the AzCopy tool and create CSV file for mapping PST file into o365 account.
| Workload |
FilePath |
Name | Mailbox | IsArchive | TargetRootFolder |
| Exchange | Backup.pst | [email protected] | FALSE |
- Now open the import data window or check on the both given option and click next. And click Select Mapping File or Upload CSV file and validate it >> Save.
- Once it complete you can see your all OST file successfully migrates into Office 365 and close that window.
Method 2: Import OST to O365 Exchange Online using Third-Party Solution
In the above way, you can see that the manual process is not easy for a non-technical person and also time-consuming. So here I am recommended you one more method which is a third-party solution. There are many third-parties available but I suggest you MailsDaddy OST to Office 365 Migration Tool. This is the best solution for converting OST file data like emails, contacts, calendars, appointments, and attachments etc. into Office 365 mailbox.
Follow the given instruction to use the OST to Office 365 migration tool:
Step 1: Download & Install the Application
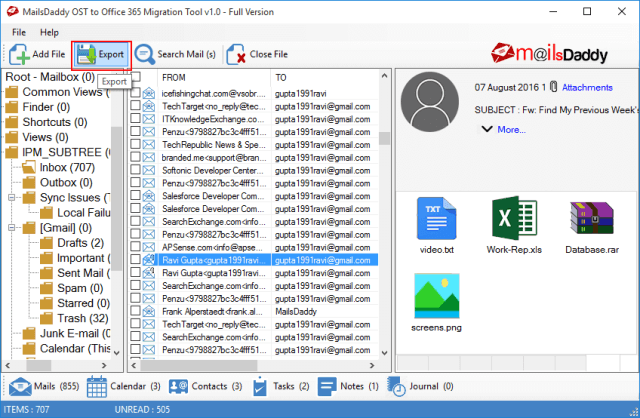
Step 2: Lunch the installed software and click the Add File to upload OST file.
Step 3: After upload OST you can see the preview of all OST items and hit on Export Button.
Step 4: At the last you need to login your Office 365 Account. That’s it.

Conclusion:
In this article, I explained two possible methods to know how to upload & convert OST file into Office 365 Exchange Online Mailbox. First one is the manual way and another one is third-party solution. So you can select any one of them for importing OST file data into O365 Cloud Platform. If you have any doubts, just leave a message on the comment box. I will be happy to help you.