
If you are using a printer, then be prepare one day it will be necessary to replace the cartridge on this device. Many owners of office equipment prefer to seek the help of specialists. But you can easily apply your DIY skills to replace it. The main thing is to know the whole technology because Brother printers are based on modern innovations. Thus, you need to take into account various nuances and avoid mistakes that may affect the operation of the printing device.
Stage #1: Get Your Cartridge
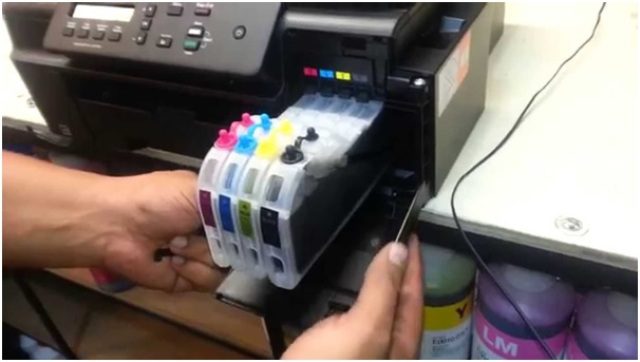
The first step is to remove the cartridge from the printer. Make it pretty simple. But, before proceeding with the removal of parts, the manufacturer recommends wearing gloves and use waste cloth that you should not mess with. This is due to the reason that leftover residue in the old cartridge can wake up on you.
When you are ready, you can begin. In this case, the following instructions will help you to get the cartridge from the printer:
Turn on the printer. Only on some models of brother printers need power off at the time of replacement.
Now you need to get access to the “internals”, where the ink tank is located. This usually requires opening or pushing the front cover. But, be careful – on many models there are special latches. Some devices need to press the corresponding button.
What to do next? Remember, on your inkjet printer most models have easy to locate the position, where you can easily reach by hand. On the other side, some models have a special indicator key that needs to be pressed carefully.
Next, you need to remove the cartridge from the printer. This is done in different ways. It all depends on the manufacturer and model. After all, each device is equipped with its own mechanisms that hold the cartridge. For example, many inkjet printers need to lower the lever. In these cases, you need to slightly push the cartridge so that it can easily come out of the printer. Whereas, some containers with toner need to be removed in a different way- you need to take a hand up the top and pulling up at an angle from the attachment point. There is another category of printers that must remove the reset button on the side of the carriage to remove the cartridge. To remove the cartridge from them, you need to open the cover, remove the protective flap and remove the guide tape.
Take out consumables carefully! At the same time do not try to touch other internal parts. It is also not recommended to touch the drum unit or moving parts of the cartridge.
Stage #2: Prepare The Cartridge For Replacement
The hardest part is left behind. Now let’s prepare the cartridge for replacement. To do this, you need to either refill it with ink or purchase a new one. For this, you can buy the same model of consumables and if purchases non-original then go with compatible option only.
If you choose a new cartridge, then first of all gently pull it out of the shockproof and sealed packaging. Just open and remove it from the consumables. And performing this procedure, try not to touch the nozzles and photo drum.
Always consider the fact that a new cartridge sometimes wakes up. Therefore, it’s better to replace it on the surface and that must be protected by newspaper or film. You can also use special clothing to place.
Do not forget to remove the protective tape and the safety tape, which is located on the cartridge (as a rule, these are reed stickers with colour index). Then turn the ink bottle back and forth several times, keeping it horizontal. This is done in order to evenly distribute the paint inside the cartridge, which could stagnate during transport or long-term storage.
Stage #3: Insert A New Cartridge
Now, you need to correctly put a new cartridge that you either purchased from the store or refilled yourself with ink. To do this, we recommend to consider the following:
- Shook up the cartridge for better ink distribution. And then insert it into the printer. It must be inserted into corresponding grooves.
- At the same time, you do not make significant efforts. Otherwise, you can break the cartridge or damage the mechanisms that hold it. It should move freely, smoothly and easily along special guides. If you feel that the cartridge does not go further or incorrectly fixed, then remove it and repeat the procedure.
- Make sure that the cartridge must not place “upside down” and not backwards
- On many models of inkjet printers, there is a resistant mechanism. In this case, you need to make sure that the cartridge has been firmly inserted. This will tell you a characteristic click when pressed.
- Next, you need to close the lid. Wait until the device goes into operation. You managed to change the cartridge yourself!
- In the end, you can print a test page. This is done with a view to ensuring that the cartridge and the printer are working.
Bottom Line
Each printer has its own design features that influence the cartridge replacement procedure. Therefore, if something goes wrong with you or you do not know how to remove the ink cartridge from the device, then refer to the instructions or look for information on the Internet. Most importantly, never go with a fake cartridge as they have the talent to damage your printer and do not provide premium quality output.
About Author:-
Claire Eades is the Digital Marketer at Cartridgesale – online retailers for genuine brother ink cartridges in Australia. She started her career in 2010. Claire has a strong technical SEO background in creative writing and journalism. She is an industry speaker & enjoys providing thought leadership on all things SEO.